
x402 Thirdweb Demo: SBC on Base
A step-by-step guide to monetizing an API with SBC payments on Base using the x402 protocol and thirdweb's hosted facilitator — no subscriptions, no API keys, no payment forms.
Ever wanted to monetize an API with crypto — no subscriptions, no API keys, no payment forms? The x402 protocol makes it possible by turning the HTTP `402 Payment Required` status code into an actual payment flow, and thirdweb's hosted facilitator handles the on-chain settlement.
In this guide, you'll build a working demo that accepts SBC (Stable Coin) payments on Base for API access. By the end, you'll have a server that charges 0.01 SBC per request, a CLI client that pays automatically, and a web UI where users can connect their wallet and pay in the browser.
What You'll Build
The demo has three parts:
- An Express server with a paid
/paidendpoint that charges 0.01 SBC per request - A CLI client that automatically detects the 402 response, signs an ERC-2612 permit, and retries with payment
- A React web app where users connect their wallet and pay through the browser
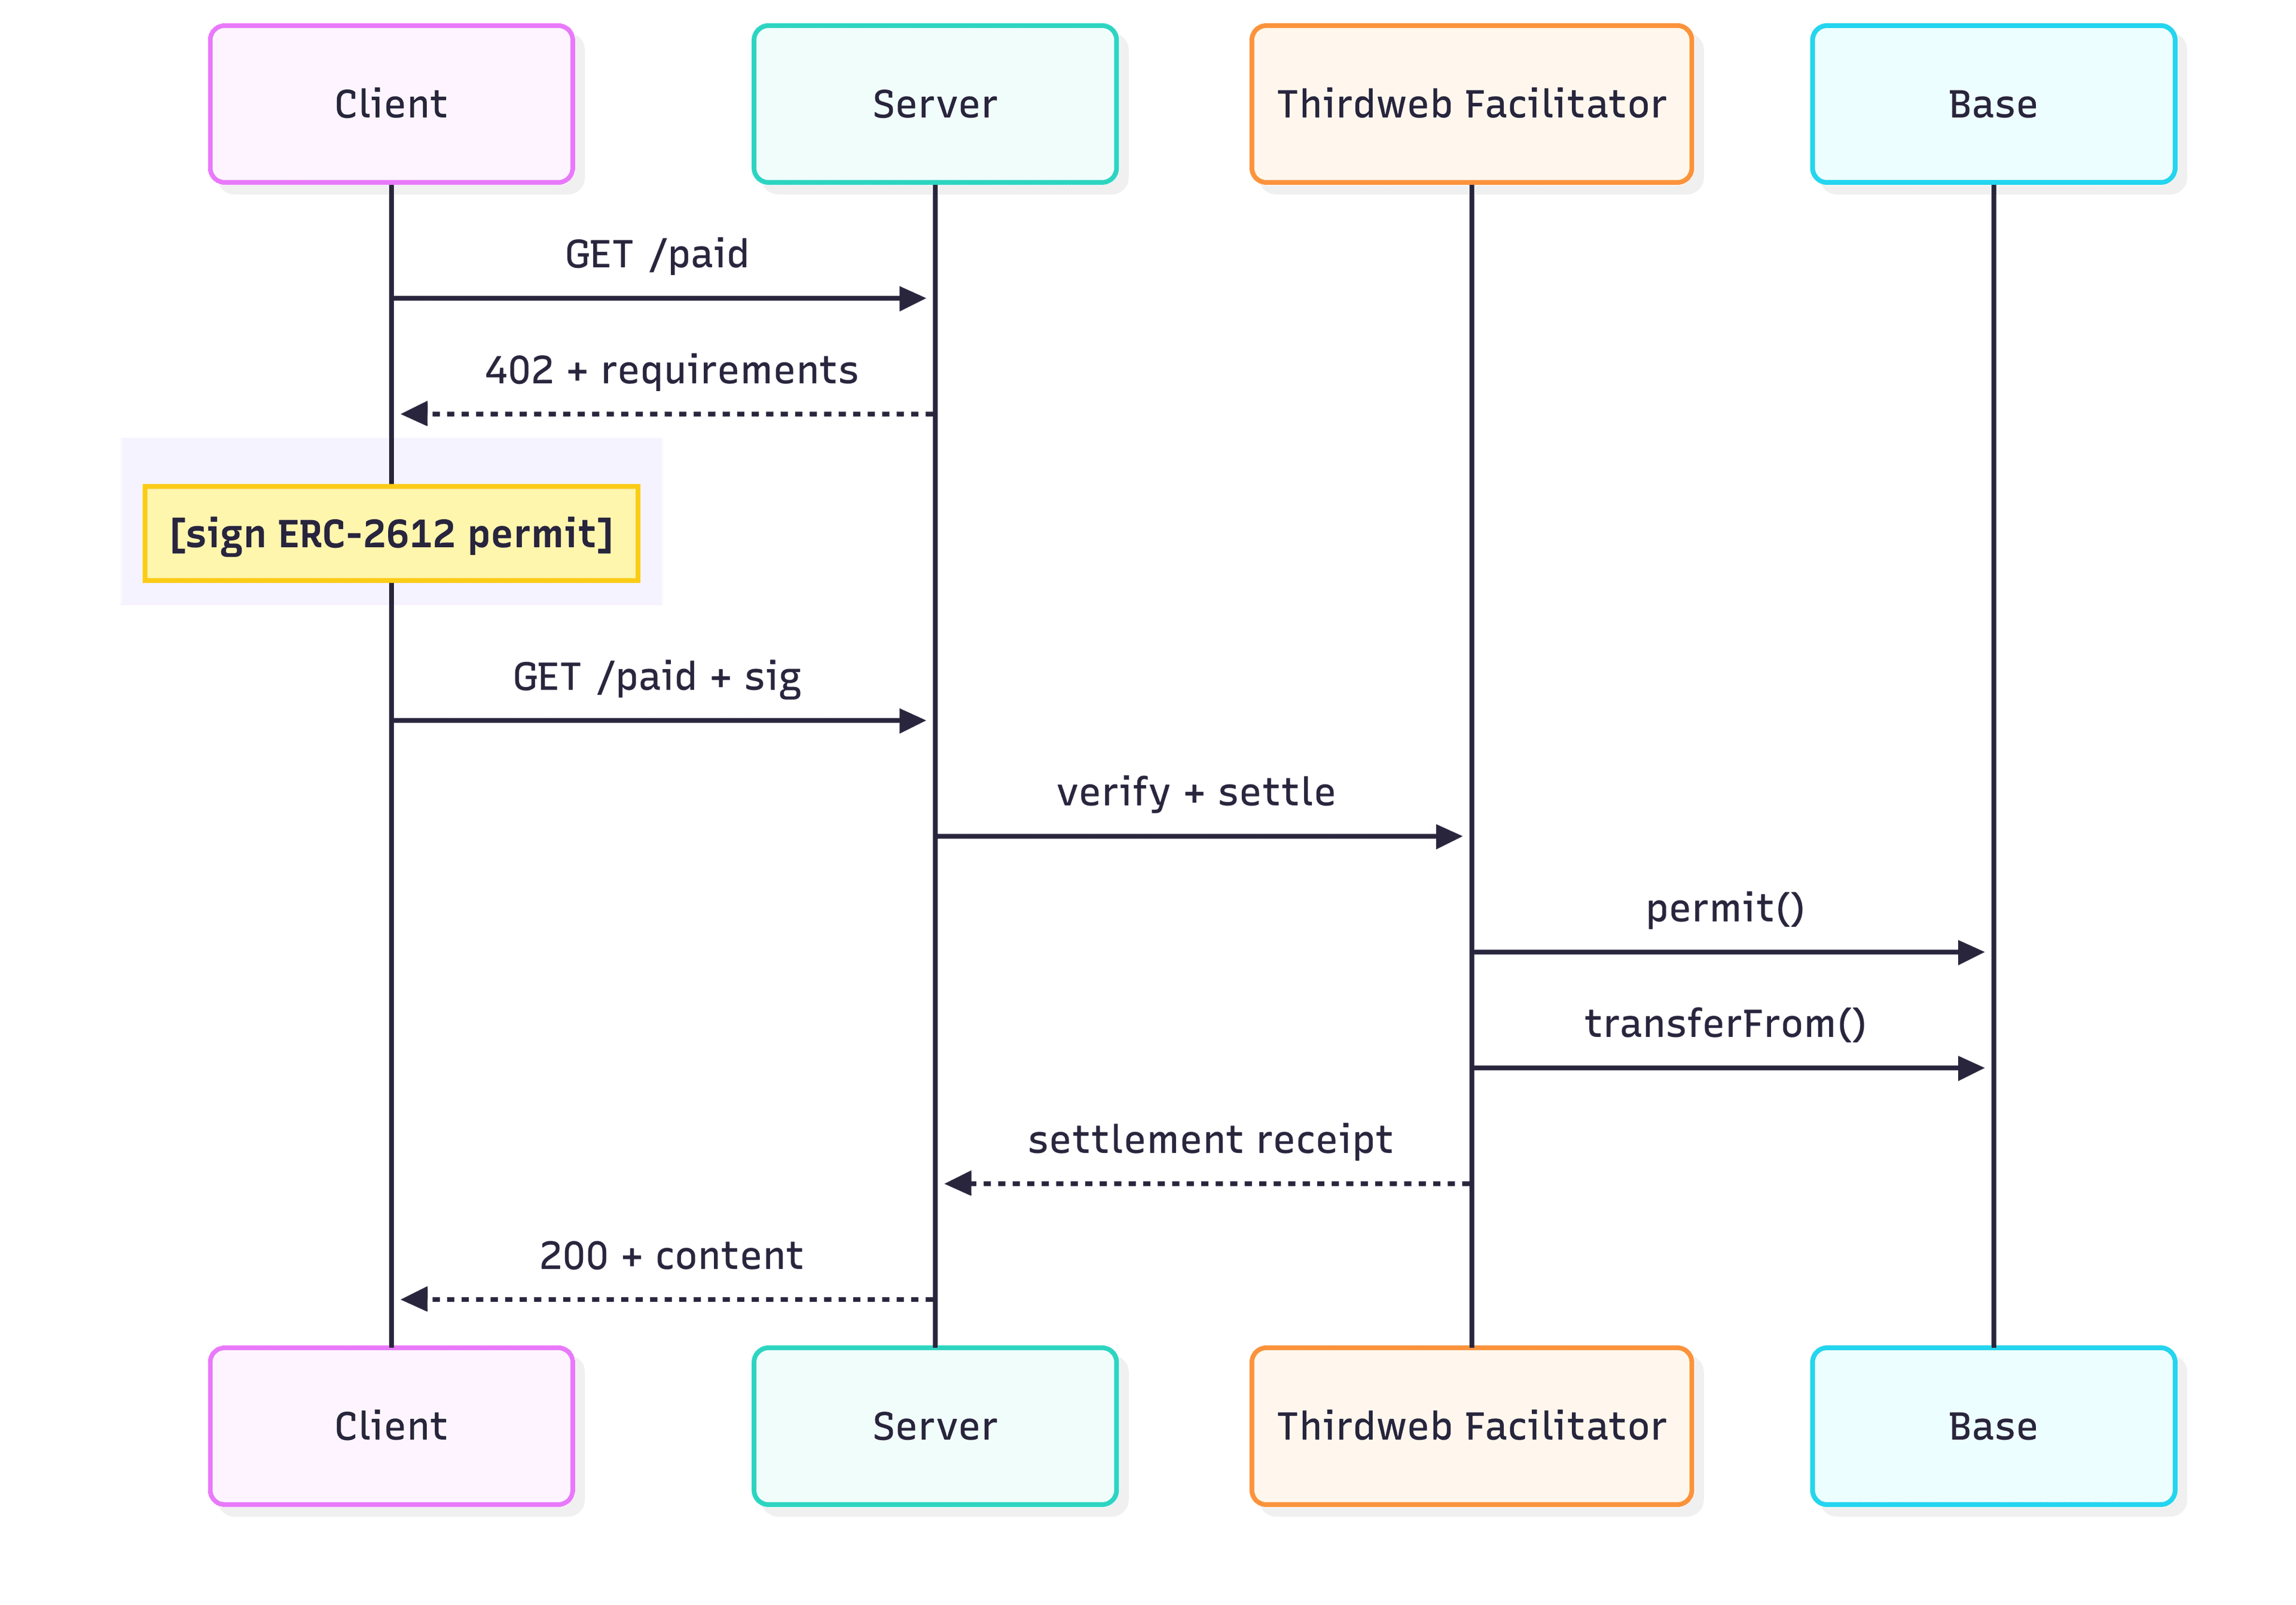
Here's the payment flow at a glance:
Prerequisites
Before you begin, make sure you have:
- Node.js 18+ installed
- A GitHub account to clone the repo
- A MetaMask or other browser wallet (for the web demo)
- Some SBC tokens on Base for testing payments (the payer wallet needs them)
Step 1: Set Up Your Thirdweb Account and API Keys
Everything in this demo authenticates through thirdweb, so you'll need to create an account and generate your keys first.
1.1 Login or Create a Thirdweb Account
- Go to thirdweb.com and click Login.
- Connect your wallet (MetaMask, Coinbase Wallet, etc.) — you'll be prompted to sign a message to verify ownership.
- Once signed in, you'll land on the thirdweb team overview dashboard.
1.2 Create a Project and API Key (Client ID + Secret Key)
The API key gives your app access to thirdweb's infrastructure — RPCs, the x402 facilitator, and more.
- Click Create Project.
- Give your key a descriptive name (e.g.
x402-sbc-demo). - For development, you can leave domain restrictions empty. In production, restrict to your domain.
- Click Create to generate the key.
- You'll see two values — save both immediately: Client ID (frontend, public) and Secret Key (backend, private).
- Check the confirmation box and click Complete.
Important: The Secret Key is only shown once. If you lose it, you'll need to create a new API key.
Step 2: Server Wallet Details
To configure the environment variables in Step 4, you'll need the server wallet's address, private key, and vault access token.
The server wallet is what thirdweb uses to sign and settle payments on-chain on your behalf. It's secured through thirdweb's Vault — their non-custodial key management system.
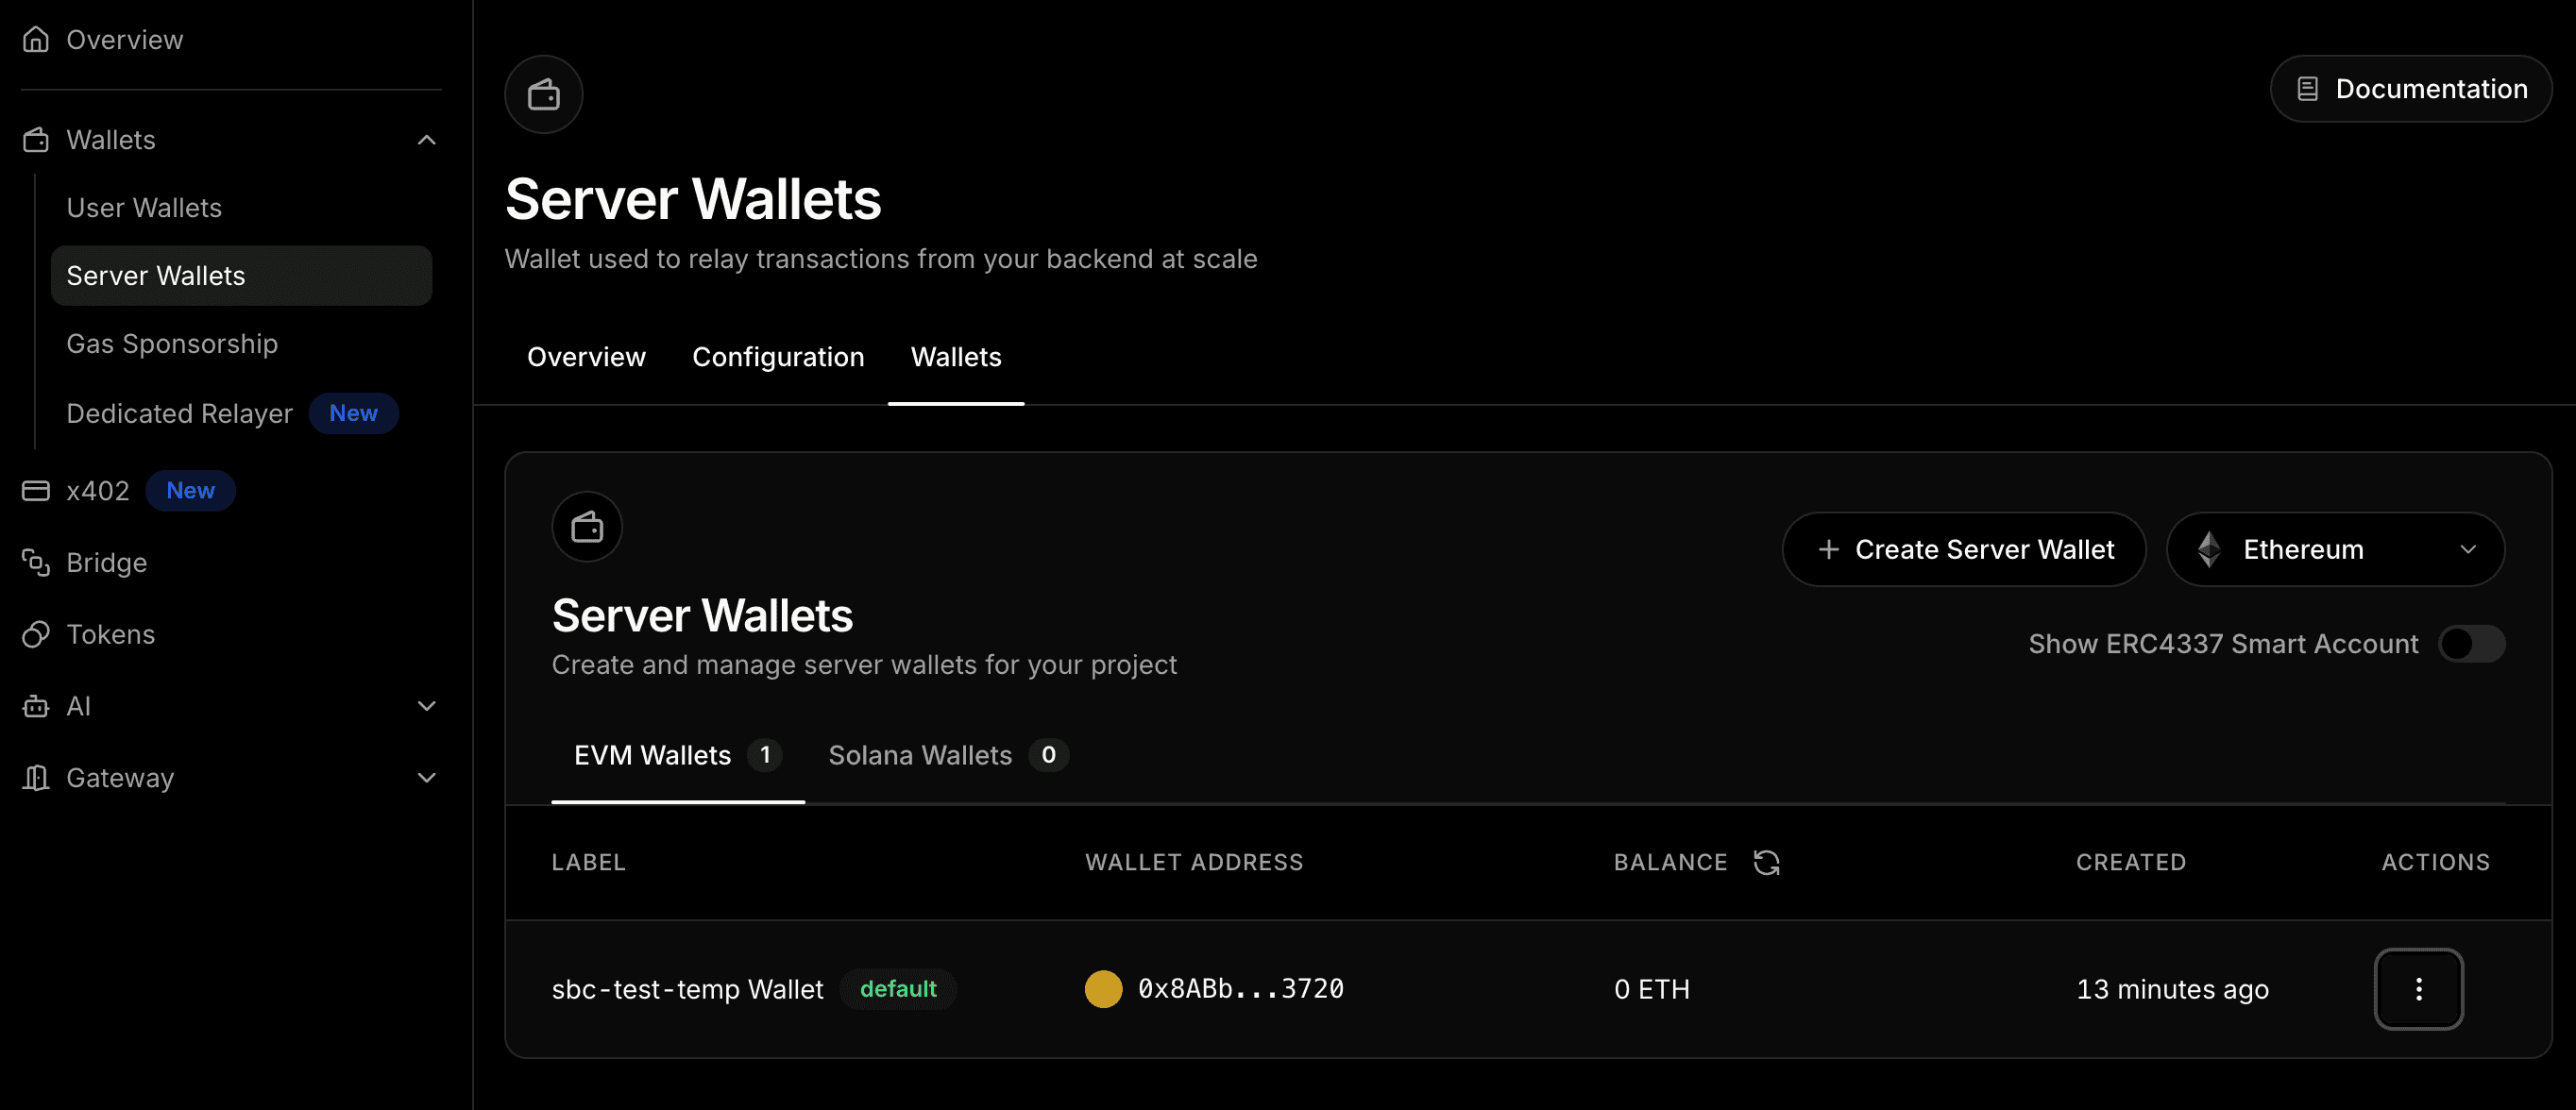
Navigate to the Server Wallets view to locate the information.
2.1 Get the server wallet address
- Locate the wallet address.
2.2 Get the Vault Access Token
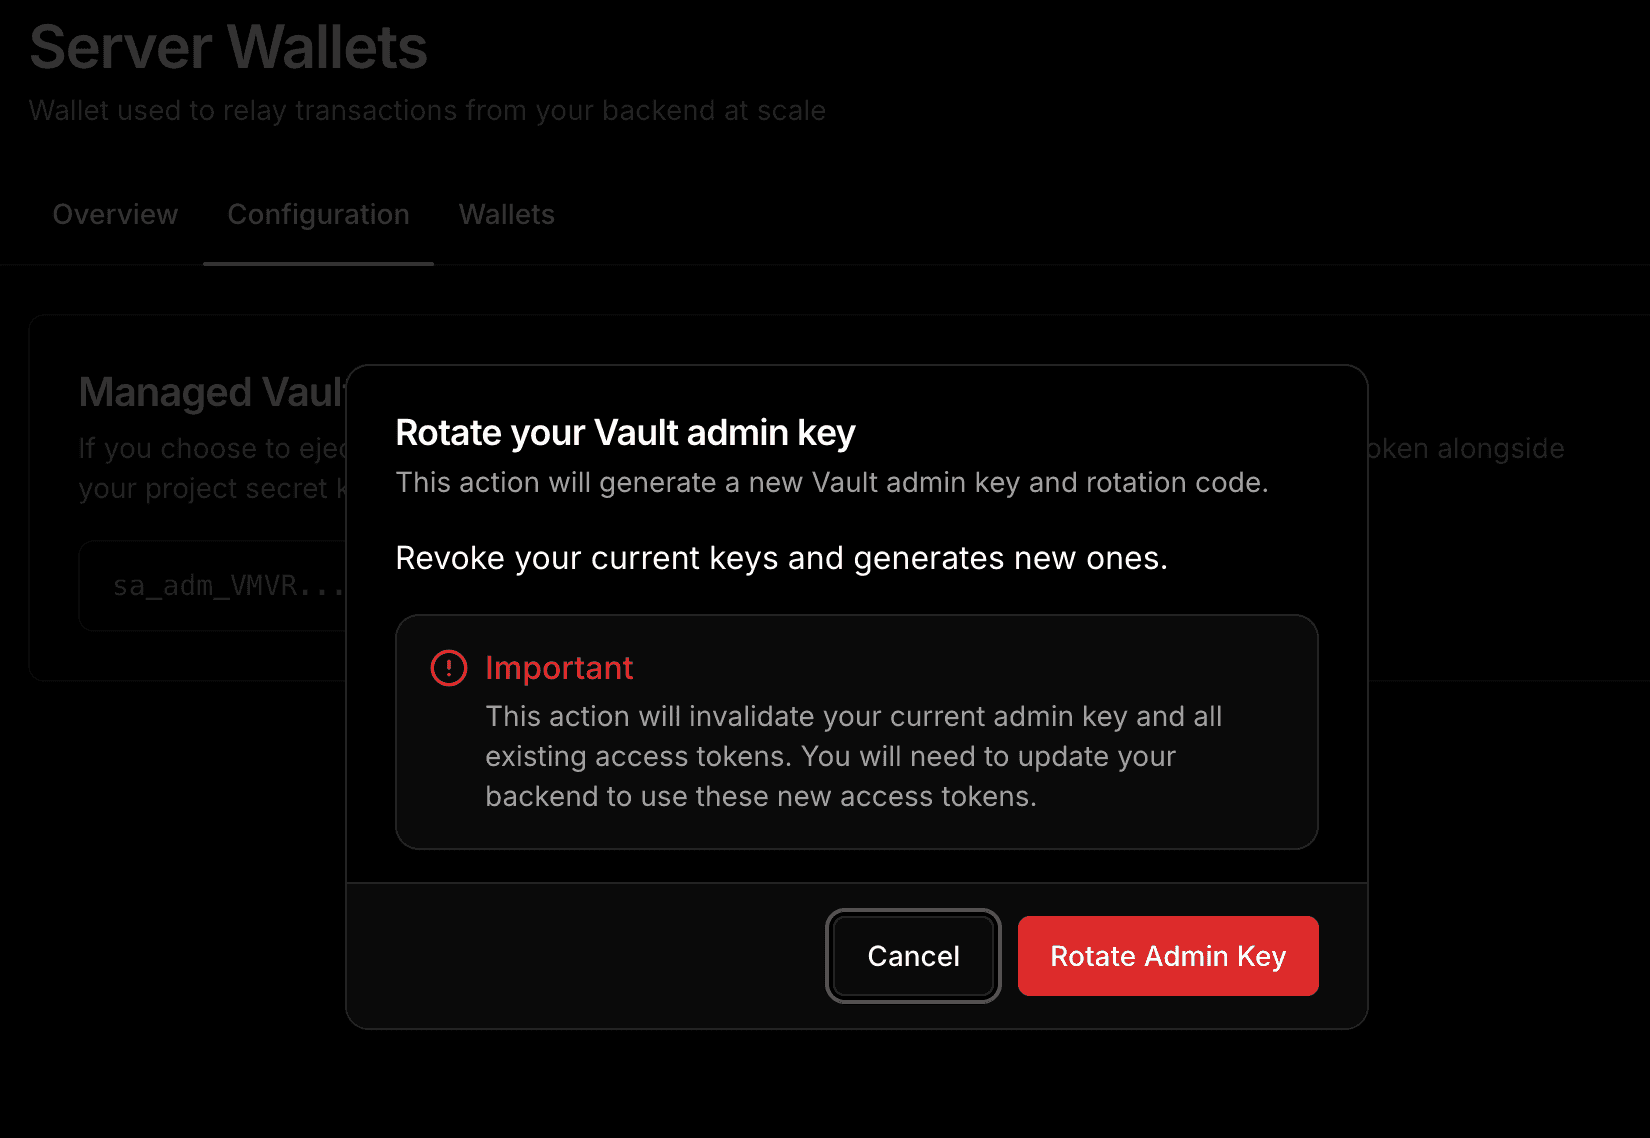
The Vault Access Token allows your backend to sign transactions using the server wallet.
- Navigate to the Configuration tab.
- Click Rotate Admin Key. This will generate new vault keys. Securely save the new vault admin key and new vault access token.
- The vault access token will start with
vt_act_...— save this immediately.
Step 3: Clone the Repository and Install Dependencies
Now that your thirdweb credentials are ready, let's set up the code.
git clone https://github.com/stablecoinxyz/x402-thirdweb-demo-base.git
cd x402-thirdweb-demo-base
npm install

# Web demo dependencies
cd web
npm install
cd ..
Step 4: Configure Your Environment Variables
Copy the example environment file and fill in your values:
cp .env.example .envOpen .env in your editor and fill in each field:
# Your thirdweb Secret Key — https://portal.thirdweb.com/account/api-keys
THIRDWEB_SECRET_KEY=your-secret-key-here

# Server wallet — https://portal.thirdweb.com/engine
SERVER_WALLET_ADDRESS=0xYourServerWalletAddress

VAULT_ACCESS_TOKEN=vt_act_your-token-here

MERCHANT_ADDRESS=0xYourMerchantAddress

# CLI client only (never commit real keys)
CLIENT_PRIVATE_KEY=0xYourClientPrivateKey

# Web demo — public Client ID
VITE_THIRDWEB_CLIENT_ID=your-client-id-here
Security note: The CLIENT_PRIVATE_KEY is only for the CLI demo. In production, users sign transactions with their own wallets. Never share or commit private keys.
Step 5: Verify SBC Support with the Probe
Before running anything, check that thirdweb's facilitator actually supports SBC on Base:
npm run probeYou should see output confirming that SBC is recognized, with details like:
primaryType: "Permit"— confirms ERC-2612 supportdecimals: 18— matches SBC's configuration- Chain: Base (8453)
If the probe returns an error, double-check that your THIRDWEB_SECRET_KEY is set correctly in .env.
Step 6: Run the Server
Start the Express server:
npm run devThe server starts on port 3002 with two endpoints:
GET /— Free health check, always returns 200GET /paid— Premium content, returns 402 if no payment (0.01 SBC per request)
Under the hood, the server uses settlePayment() from the thirdweb SDK. When a request hits /paid:
- No payment header? Returns
402with payment requirements (token address, amount, chain) - Has payment header? Forwards the signed permit to the thirdweb facilitator
- Settlement confirmed? Returns the premium content
The price is configured as a custom ERC-20 token amount in src/constants.ts:
price: {
  amount: "10000000000000000", // 0.01 SBC (18 decimals)
  asset: {
    address: "0xfdcC3dd6671eaB0709A4C0f3F53De9a333d80798",
    decimals: 18,
    eip712: {
      name: "Stable Coin",
      version: "1",
      primaryType: "Permit",
    },
  },
}
Step 7: Make a Paid Request with the CLI Client
Open a second terminal and run the client:
npm run clientThe client demonstrates the full payment flow:
- Hits the free endpoint (GET /) — works normally, returns 200
- Hits the paid endpoint (
GET /paid) — receives a402response - Parses the payment requirements from the
402response - Signs an ERC-2612 permit using the
CLIENT_PRIVATE_KEY - Retries the request with the signed payment in the header
- Receives the premium content with a 200 response
This is powered by wrapFetchWithPayment() from the thirdweb SDK, which wraps the standard fetch API to automatically handle the 402 flow.
Step 8: Run the Web Demo
For a visual, browser-based experience:
# Terminal 1 — server (if not already running)
npm run dev

# Terminal 2 — web app
cd web
npm run dev
Open http://localhost:5173 in your browser.
Using the Web Demo
- Click Connect Wallet — choose MetaMask, Coinbase Wallet, or any supported wallet on Base.
- Make sure your wallet is connected to the Base network.
- Click Get Premium Content.
- Your wallet will prompt you to sign an ERC-2612 permit (this is not a transaction — it's a gasless signature).
- The app retries the request with the signed permit, and you'll see the premium content along with the settlement receipt.
The web app uses thirdweb's useFetchWithPayment() React hook, which handles the entire 402 detection, signing, and retry flow in the browser.
SBC Token Reference
| Property | Value |
|---|---|
| Name | Stable Coin |
| Symbol | SBC |
| Contract Address | 0xfdcC3dd6671eaB0709A4C0f3F53De9a333d80798 |
| Chain | Base (Chain ID: 8453) |
| Decimals | 18 |
| Permit Standard | ERC-2612 (EIP-712 domain version "1") |
| Backing | 1:1 USD, full reserve |
| Basescan | View on Basescan |
Adapting This for Your Own Token
Any ERC-20 token that supports ERC-2612 permit() will work with x402. To swap in your own token, update the values in src/constants.ts:
export const SBC_TOKEN_ADDRESS = "0xYourTokenAddress";
export const SBC_DECIMALS = 18;
export const SBC_TOKEN_NAME = "Your Token Name"; // must match on-chain EIP-712 domain name
To find your token's EIP-712 domain name, query the contract directly:
cast call 0xYourTokenAddress "name()(string)" --rpc-url <RPC_URL>Troubleshooting
Probe fails with authentication error: Double-check your THIRDWEB_SECRET_KEY in .env. Make sure you're using the Secret Key, not the Client ID.
Client gets a 402 but doesn't retry: Ensure CLIENT_PRIVATE_KEY is set and the wallet has SBC tokens on Base.
Web app can't connect wallet: Make sure VITE_THIRDWEB_CLIENT_ID is set in your .env file (note the VITE_ prefix — Vite requires this to expose the variable to the frontend).
Settlement fails: Check that your server wallet has been properly created in the thirdweb dashboard and the VAULT_ACCESS_TOKEN is valid.
What's Next
- Set custom prices by adjusting the amount in
src/constants.ts - Protect multiple endpoints by applying the payment middleware to any route
- Build a production API using the same pattern with your own Express, Next.js, or Hono backend
- Deploy the web app with
cd web && npm run build— built files are served by the Express server
Resources
- x402 Protocol — the standard behind HTTP-native payments
- thirdweb x402 Documentation
- thirdweb x402 Facilitator
- thirdweb API Keys
- thirdweb Server Wallets
- SBC Documentation
- SBC on Basescan
- Coinbase x402 Repo — the original x402 reference implementation